|
l
|
You specified the prepay was Manual when the receipt was made. (For more information, see “To enter a prepay so that it must be manually applied to a charge”.)
|
|
l
|
You specified an account for which a charge would never be created in the Hold for field on the Account Info screens for the prepay G/L accounts. (For more information, see “Setting Up Prepay G/L Accounts”.)
|
You apply prepays to charges with a zero receipt. You create a zero receipt like you create a standard receipt, but instead of recording the receipt of funds, a zero receipt records the application of previously receipted prepay funds to a charge. You can also use a zero receipt to apply a negative charge to a charge.
This section does not describe the entire procedure for creating a receipt; that information appears in Chapter 4, “Receipts.” Instead, this section describes the unique steps required to create a zero receipt.
|
|
Charges marked Hold on the Charge screen cannot be paid with this procedure. You must manually remove the hold from all charges to which you want to apply prepays. See “Editing Charges”.
|
|
1
|
|
2
|
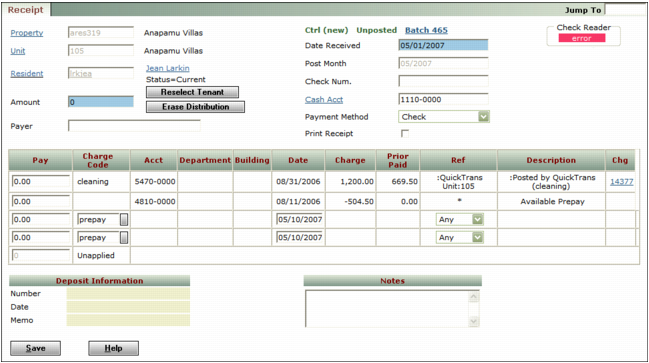
In the Receipt screen, after you click Enter Detail, replace the number in the Amount field with a 0 (zero).
|
|
|
If you do not type a zero in the Amount field before pressing the TAB key or clicking to navigate to a different field, Voyager distributes the default amount, which is the amount of the charges, in the table. If that occurs, you can type over the amounts in the Pay column in the table.
|
|
3
|
In the Pay field for the charge, type the amount of the prepay that you are applying to the charge.
|
|
4
|
In the Pay field for the prepay, type the prepay amount as a negative number.
|
|
5
|
Click Save.
|