You can export transaction information and data to CSV-format data files. You can export transactions that are associated with a property and person (resident/tenant, owner, or vendor). Voyager exports one record for each line-item detail in a transaction. For transactions with multiple details, the export file contains multiple lines of data. When imported, the lines recombine to form one transaction in the destination database. You can also select or create a format template (FMT) file to specify and define the exported data for importing back into Voyager or to other financial applications. For more information, see “Using format templates for exporting to CSV files”. Exporting transactions does not affect the source database.
|
1
|
From the Voyager System Administration side menu, select Toolbox > Import/Export > Export Tran - CSV. The Export Transactions - CSV filter appears.
|
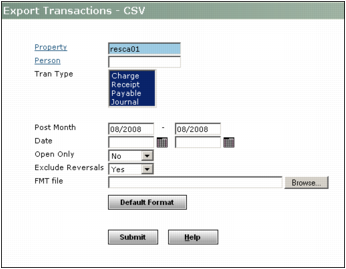
Property Type or select the code of the property from which you want to export transactions.
Person If you want to export only those transactions that are associated with a person (resident/tenant, vendor, or owner), type or select the code for that person. If you want to export transactions regardless of any associations to specific people, leave this field empty.
Tran Type Select the types of transactions that you want to export.
Post Month Type a post-month range for the transactions that you want to export. If you want to apply a date filter, do one of the following:
|
n
|
If you want to export all transactions that were posted on or after a certain month, type the month and year in the first field and leave the second field empty.
|
Date Type a date range for the transactions that you want to export. If you want to apply a date filter, do one of the following:
Exclude Reversals Select Yes or No, depending on whether or not you want to export reversed transactions from the export file (for example, those resulting from operations such as Reverse Receipt, Reverse Invoice, Void Check, or Reverse Journal Entry).
Open Only If you want to export only open transactions, select Yes. If you want to export all transactions, both open and closed, select No.
|
|
If you select Yes, this option will strictly limit the transactions eligible for export and can override other import filter selections, such as date ranges.
|
FMT File If you want to apply a format template file to the export data, type or select the template file name and path in the FMT File field.
For more information about creating a default format template file, see “To create a default format template file”.
For more information about using format template files, see “Using format templates for exporting to CSV files”.
|
3
|
|
1
|
If the Export Transactions - CSV filter is not already open, open the screen. For more information, see “To export transactions to a CSV file”.
|
|
2
|
|
|
The format file name that you specify is the one that you will type or select in the FMT File field on the Export Transactions - CSV filter.
|