|
|
|
|
|
1
|
From the Excel top menu, select Tools > Set Default Picture Folder.
|
|
3
|
Click Open. A message appears confirming your selected default folder.
|
|
|
|
1
|
From the Excel top menu, select File > Open.
|
|
4
|
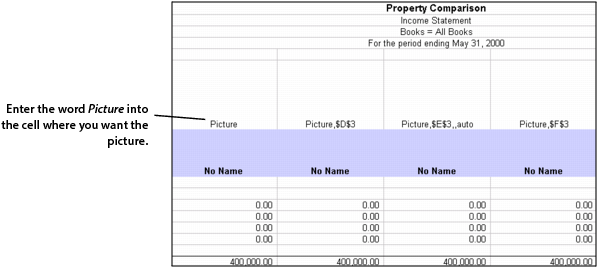
In the cell, enter the word Picture (all seven letters, case insensitive, with no leading characters such as quotes or equal signs).
|
|
Picture (Required)
|
Enter all seven characters (case insensitive) into the cell. Note that entering the word Picture in a worksheet cell is the easiest method of inserting a picture into a YSL report.
|
|
SCode Reference (Optional)
|
|
|
File Path (Optional)
|
Enter Def or Default to select the default pictures folder. (If left blank the default folder is assumed.) If the referenced picture is not in the default folder, enter the directory path where the picture is located.
|
|
Scale (Optional)
|
Enter Auto if you want the picture scaled to the exact dimensions of the cell. If left blank, the default of automatic scaling is assumed.
|
In most cases, you should use the YSL default automatic scale setting. Automatic scaling is applied to the inserted picture when the Scaling parameter is set to AUTO or automatic (case insensitive), or is left blank. With automatic scaling, the inserted picture is resized to fit the exact dimensions of the referencing cell. Once inserted, you can adjust the cell and/or picture size using Excel formatting options.