|
|
Application charges are set up for the unit type of the applicant's unit. Some charges are optional or have modifiable amounts. Occupants with relationship types of Spouse, Roommate, Guarantor, Other may be subject to the some charges. For information about setting up application charges on unit-type records, see “Adding Unit Types” in the Voyager Core Setup Guide.
Approving an applicant allows you to execute the applicant's lease and post a move-in for the applicant. You can also deny or cancel the applicant. For more information, see “Denying, Canceling, and Re-applying Applicants”.
Lease documents are generated from report packets, which combine multiple documents, such as lease agreements and new prospect letters, into a single PDF. Your system administrator sets up report packets for lease documents.
|
|
You do not need to finish processing an applicant at one time; Voyager saves the applicant's guest card after you complete each procedure so that you can exit Voyager and resume processing the applicant later. For more information, see “Reviewing Guest Cards”.
|
1
|
|
2
|
If the Application Form tab is not already open, click the Application Form link on the Leasing Steps menu. The current tab changes to the Application Form tab.
|
|
a
|
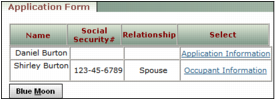
Click the Application Information link in the row corresponding to the prospect, or the Occupant Information link in the row corresponding to the occupant. The Application for [Prospect/Occupant] screen appears.
|
|
d
|
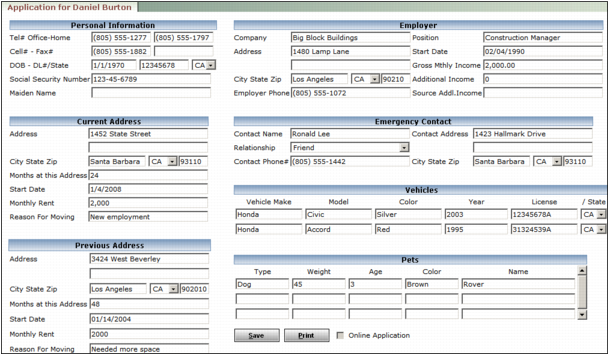
Click Save.
|
|
a
|

|
b
|
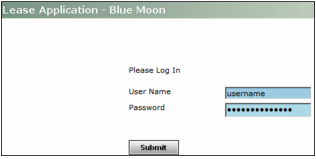
Complete the screen and click Submit. The Getting Started screen on the Blue Moon online application appears.
|
|
d
|
|
5
|
Click Next. Voyager saves the guest card. The Application Form tab changes to the Application Charges tab.
|
|
|
The table on the Application Charges tab shows the number of occupants (including the prospect) to which each charge will be applied.
|

|
Select your name, or the name of the leasing agent authorized the charges. By default, this is the agent selected in the Agent field on the Prospect Guest Card screen. For information about setting up the options in this field, see “Adding Leasing Agents”.
|
|
7
|
If you want to apply an optionalcharge, select the Select check box in the row corresponding to that charge.
|
|
8
|
If you want to modify the amount of a modifiable charge, type the new amount in the Amount field in the row corresponding to that charge.
|
|
9
|
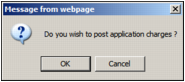
Click Next. A confirmation request appears.
|
|
10
|
Click OK.
|
|
11
|
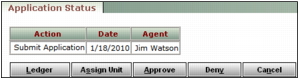
If you are holding the unit for the applicant, a second confirmation request appears. Click OK. Voyager saves the guest card. The Application Charges tab changes to the Application Status tab.
|
|
|
|
12
|
If you want to select a new unit for the applicant, click the Assign Unit button. The Select Unit tab appears. For more information, see “Editing Unit Selection for Prospects and Applicants”.
|
|
13
|
If you want to screen the applicant, click the Credit Check button at the top part of the screen. The Credit Check screen appears. For more information, see “Screening Applicants and Occupants”.
|
|
14
|
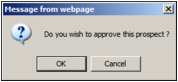
Click the Approve button.
|
|
|
|
15
|
|
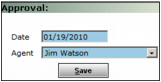
Select your name, or the name of the agent who approved the applicant. By default, this is the agent selected in the Agent field on the Prospect Guest Card screen. For information about setting up the options in this field, see “Adding Leasing Agents”.
|
|
17
|
Click Save. A confirmation request appears.
|
|
18
|
Click OK. Voyager saves the guest card.
|
|
a
|
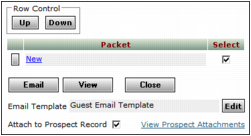
Click the Lease Doc button. The lease-document selection screen appears.
|
|
b
|
If you want to be able to review the lease documents after you generate them, as attachments on the guest-card record, select the Attach to Prospect Record check box.
|
|
c
|
Select the Select check box in the row corresponding to the report packets that you want to generate.
|
|
d
|
If you want to print the selected report packets, click the View button. A PDF document of the selected packets appears. Print the PDF document.
|
|
e
|
If you want to email the selected report packets to the resident, click the Email button. A confirmation request appears. Click OK.
|
|
f
|
Click Close.
|
|
a
|
|
b
|
Complete the screen and click Submit. The Blue Moon online forms screen appears.
|
|
c
|
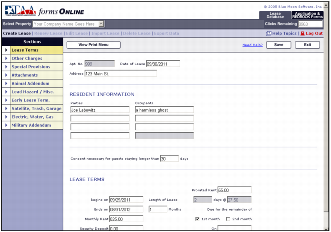
Click the View Print Menu button at the top of the screen. For more information, contact Blue Moon technical support.
|