|
|
If you need to change the cash account for multiple invoice registers, you can use the Cash Account Update function. For more information, see “Updating the Cash Account of Multiple Payables and Invoice Registers”.
|
|
1
|
On the side menu, select Invoice Register > Invoice Register Dashboard. The Invoice Register Dashboard appears.
|
|
|
|
3
|
Click Submit. The results matching your search criteria appear on the Invoice Register tab, organized by the summary level that you selected in the Summarize By field. For more information, see “Invoice Register Dashboard: Invoice Register Tab (Summarize By: Details)”.
|
|
a
|
Navigate to the Invoice Register screen. How to navigate to the Invoice Register screen is dependent on the summary level you selected in the Summarize By field. For information about how to navigate to the Invoice Register screen, see “Invoice Register Dashboard: Invoice Register Tab (Summarize By: Details)”.
|
|
b
|
Click the Images tab to view the image. For more information, see “Invoice Register Screen: Images Tab”.
|
|
d
|
Click Validate. Voyager validates the invoice information entered. If you entered valid data, “Payable is valid” appears at the top of the screen. If there are issues, one or more messages appear at the top of the screen.
|
|
e
|
Click Save. Voyager saves the invoice information.
|
|
f
|
Click the
|

|
Details Displays the details of all invoices sorted by the control number.
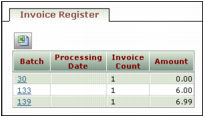
Batch Displays the invoice count and total amount of each batch.
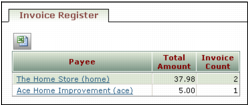
Payee Displays the total amount and invoice count for each payee.
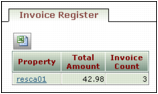
Property Displays the total amount and invoice count for each property.
|
|
|
The Expense Type field contains the list of items defined when expense types were set up. For more information, see “Setting Up Expense Types”.
|
|
|
NOTE If you want the Post Month field to be required on the AP Configuration screen select the IR Dash - Post Month Required check box. For more information, see “AP Configuration Screen”.
|
|
|
To display invoice register batches with a particular sequence of characters in the Description field, type that in this field. Refer to “Invoice Register Batch Screen”.
|
|
|
Ready for data entry Displays invoice register records created via Invoice Register > Scan New Invoice Batch or Invoice Register > Import PDF, that have no information entered.
Keyed Displays invoice register records with information entered, but no workflow.
Workflow in progress Displays invoice register records with an assigned workflow.
Approved Displays invoice register records where a workflow has been completed.
Posted Displays invoice register records that have been posted to a payable batch.
Keyed-Matched Displays invoice register records, created by the Full Service Processing Center or by importing Procure to Pay electronic invoices, that match the purchase order.
|
|
|
Unreceived Displays invoice register records that have purchase orders attached that have not been received. Unreceived purchase orders are those where the Quantity Received field on the Purchase Order screen is empty or contains 0 (zero).
Received Displays invoice register records that have purchase orders attached that have been partially or completely received. Received purchase orders are those where the Quantity Received field on the Purchase Order screen contains a number greater than 0 (zero).
Both Displays invoice register records that have received and unreceived purchase orders attached.
No PO Displays invoice register records that do not have purchase orders attached.
|
|
|
Select the column you want the data on the Invoice Register tab to sort by. Options are: Ctrl. No., Invoice Number, Payee, Invoice Date, Invoice Amount, Currency, Property, Expense Type, and Batch.
NOTE Also, complete the Order field.
|
|
|
Select the order you want the column selected in the Order By field to appear in.
Asc Sort in ascending order, a to z.
Desc Sort in descending order, z to a.
|

|
To view the details of an invoice, click the corresponding control number. The Invoice Register screen appears, displaying the selected invoice.
|
|
|
This field appears if the IR Dash - Post Month Required check box is selected on the AP Configuration screen. For more information, see “IR Dash - Post Month Required”.
|
|
|
Create Payable Batch button
|
|
|
Export Images button
|
1) On the Invoice Register Dashboard, Invoice Register tab, select the PDF check box beside the invoice register record image you are interested in.
2) Click Export Images. The image appears.
|
|
Clicking
NOTE If this icon does not appear, no invoice register image is attached to this invoice register. The appearance of these two icons is controlled by the Context Menu Configuration screen. For more information, see “Configuring the Invoice Register Dashboard”.
|
|
To view the details of a batch, click the corresponding batch number. The Invoice Register Batch screen appears, displaying the selected batch.
|
|
To view the details of the invoices from a payee, click the payee name. The Invoice Register screen appears, displaying the invoices for that payee.
|
|
To view the details of the invoices for a property, click the property code. The Invoice Register screen appears, displaying the invoices for the property.
|

|
To bring up a specific invoice register record, enter the invoice register record control number in the Jump To field and press the TAB key.
|
|
|
Type or select an open purchase order number and press the TAB key, to automatically complete fields on the Invoice Register screen and the Details tab with information from the Purchase Order screen. To pull in additional purchase orders, repeat this procedure.
If you do not know the purchase order number, click the PO link and select the purchase order from the list.
NOTE Purchase orders available to be pulled into an invoice register must be fully approved and the Add Payable check box, on the Purchase Order screen, General Info tab must be selected. For more information, see “Purchase Order Screen: General Info Tab”.
|
|
|
The Expense Type field contains the list items defined when expense types were set up. For more information, see “Setting Up Expense Types”.
|
|
|
If you complete the Payee field and click AP Template, the AP Template list displays AP templates for that payee and AP templates with no payee for the properties you have access to.
If you leave the Payee field empty and click AP Template, the AP Template list displays the AP templates for the properties you have access to.
|
|
|
Invoice This is the default. Select this option to record bills and other payables.
Adjustment Select this option if the payment method is electronic or online banking or any payment method other than EFT, check, or manual check. A positive Total Amount on an Adjustment increases the amount you have paid or owe a vendor.
Credit Select this option to record a credit that you receive from a vendor. A positive Total Amount on a Credit memo reduces the amount you owe or have paid the vendor.
|
|
|
Check This is the default. Select this option if paying by check.
EFT Select this option if paying by electronic funds transfer.
|
|
|
To define these fields, go to Voyager System Administration, Admin > Environment, Payable Invoice Fields.
|
|
|
The default cash account is defined on the property's Property Control screen, in the Cash Account (Payables only) field. If this field is empty, the cash account defined on the Accounts and Options screen, Essential Accounts tab, in the Cash field is used.
|
|
|
The default accounts payable account is defined on the property's Property Control screen, in the Payable Account field. If this field is empty, the accounts payable account defined on the Accounts and Options screen, Payable Accounts tab, in the Payable field is used.
|
|
|
What appears in the Display Type list is dependent on your payable display type setup. For more information, see “Setting Up Invoice Register and Payable Invoice Display Types”.
|
|
|
Displays the batch number. You can click this link to return to the Invoice Register Batch screen.
|
|
|
To view the preceding scanned invoice, click the Previous Invoice button
NOTE The Navigation buttons are available when an invoice register batch contains more than one invoice.
|
|
|
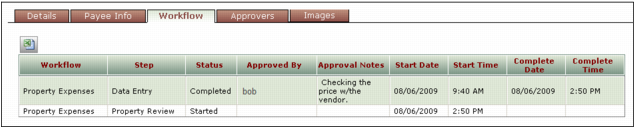
The Workflow tab displays detailed information about the progress of the invoice through the workflow.
|
|
|
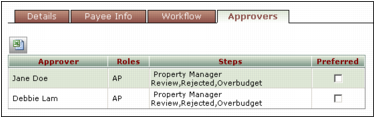
The Approvers tab displays information about the employees who are authorized to approve the invoice at this step of the workflow and the next available steps in the workflow.
|
|
|
Memorize button
|
3) Click Save.
|
|
Validate button
|
|
|
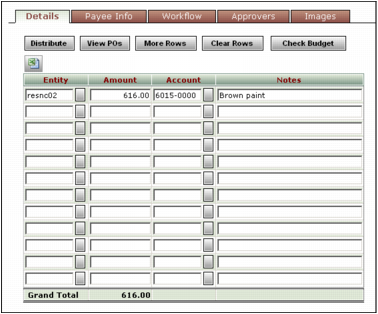
The number of detail lines on the Invoice Register screens is configurable. For more information, see “Number of Detail Lines”.
|
|
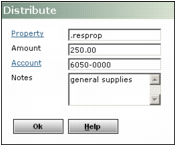
Distribute button
|
1) The Distribute screen appears.
3) Click OK.
NOTE If you want to distribute based on a property list, use the Distribute feature. If you want to distribute based on payee, expense type, property, and G/L account, use an AP template. For more information, see “Memorize button”.
|
|
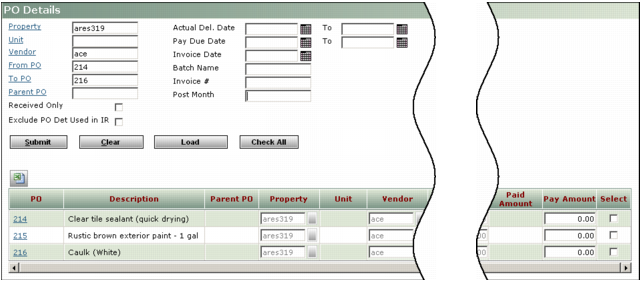
View POs button
|
1) The PO Details filter appears.
3) Click Submit.
To select one or more purchase order details and automatically complete fields on the Invoice Register screen and the Details tab with information from the Purchase Order screen, click this button. The PO Details filter appears.
2) Click Submit.
3) On the right side of the screen, complete the Pay Amount field, select the Select check box of one of more purchase order details and click Load. To select all the purchase order details, click Check All. To clear all check boxes, click Clear.
NOTE Purchase orders available to be pulled into an invoice register must be fully approved and the Add Payable check box, on the Purchase Order screen, General Info tab must be selected. For more information, see “Purchase Order Screen: General Info Tab”.
|
|
More Rows button
|
To add additional rows to the Details tab, click this button.
|
|
Clear Rows button
|
To clear all the rows of data on the Details tab, click this button.
|
|
Check Budget button
|
To check the budget before saving this invoice register record, click this button. The Budget tab appears. For more information, see “Invoice Register Screen: Budget Tab”.
If entering this invoice register record puts you over budget, a warning appears at the top of the Invoice Register screen and the Budget tab appears. If it is okay to go over budget, select the Over Budget OK check box and click Save. For more information, see “Invoice Register Screen: Budget Tab”.
NOTE Whether a user can save an over budget item is based on their security settings. For more information, see “AP Configuration Screen” and “Data Access Permissions”.
|
|
Load Contract button
|
If you have Voyager Construction Management and during setup you selected the Contract check box, this button appears. For more information, see “Payable Display Type Screen”.
|
|
NOTE If you have permission for a single property, this field is completed automatically.
|
|
|
If you choose a property list, PAYscan automatically distributes the amount based on the % field on the Property List screen.
|
|
|
NOTE If a purchase order has change orders, the original purchase order is referred to as the parent purchase order.
|
|
|
The purchase order control number. To bring up the Purchase Order screen, click this link.
|
|
|
Select the Select check box of the records you want to pull into the invoice register. To select all the purchase order details, click Check All. To clear all check boxes, click Clear.
|

|
If entering this invoice register record puts you over budget, a warning appears at the top of the Invoice Register screen, and the Budget tab appears. If it is okay to go over budget, select the Over Budget OK check box, and click Save.
NOTE Whether a user can save an over budget item is based on their security settings. For more information, see “AP Configuration Screen” and “Data Access Permissions”.
|

|
The default setting of this check box comes from the Vendor screen, Hold Payments field. For more information, see “Vendor Screen: Top Part of Screen”.
|
|
|
The default setting of this check box comes from the Vendor screen, Consolidate field. For more information, see “Vendor Screen: Top Part of Screen”.
|
|
|
The default setting of this check box comes from the Vendor screen, Check Memo From Inv field. For more information, see “Vendor Screen: Top Part of Screen”.
If this check box is selected, the memo on checks will come from the Notes field at the top of the Invoice Register screen. If this check box is clear, the memo on checks will come from the Memo field on the Vendor screen.
|
|
|
|
|
|
By default, all the Preferred check boxes are clear and all the users on this tab are notified.
For this option to work, the Preferred Approver is the Only Approver check box must be selected. For more information, refer to “Email Preferred Approvers Only”.
|
