|
3
|
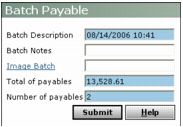
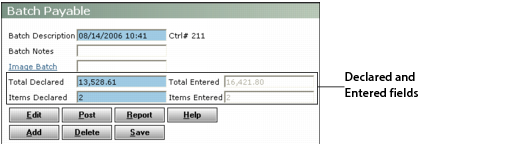
Batch Description Accept the default (system date and time) or type a new description for the batch.
Batch Notes Type remarks for the new batch. These remarks appear in the Notes field of the payable batch. The notes disappear when you post the batch.
Image Batch If you have created a document image batch with Document Manager, type or select the code for the image batch including the scanned invoice(s) you want to attach to the payables in the payable batch. See Chapter 13, “Document Manager.”
Total of payables Type the total monetary amount for payables in the batch.
Number of payables Type the total number of payables in the batch.
|
5
|
|
|
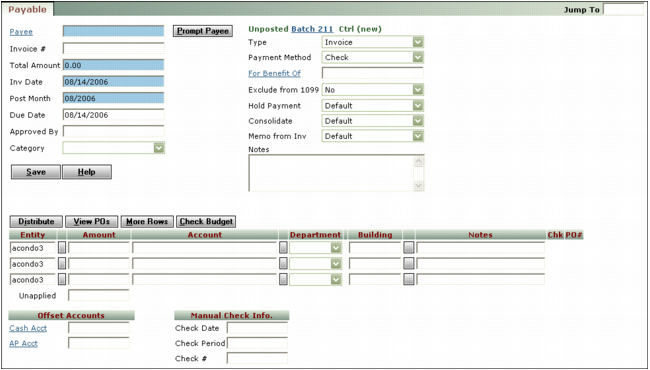
Payee Type or select a payee code. When you click the Payee link, Voyager displays a list of vendors. If the payee is a resident or tenant, you must type the code. After entering the payee code for a vendor, click Prompt Payee to apply the default setting from the vendor record to the Payment Method, Exclude from 1099, Hold Payment, Consolidate, and Memo from Inv fields.
Invoice Number For vendor payables, type the number of the vendor's invoice. For payables to applicants, owners, tenants, or residents, type an invoice number or brief description.
Total Amount Type the total amount of the payable.
Inv Date Accept the date or type a different date (mmddyy).
Post Month This field displays the month the payable affects the G/L. The field defaults to your current operating month. To change the month, type the post month over the month displayed (mmyy).
Due Date Type the date the payable will be due for processing (mmddyy).
Approved By Type the name of the person who authorized payment.
Category or custom field This field can be customized and may have a different field label defined by your organization. Complete this field in accordance with your organization's requirements.
Type Select the payable type. You process payables with a type of Invoice or Credit using the procedure for “Processing Checks”. You process payables with a type of Adjustment using the procedure for “Processing Adjustments”.
Payment Method If your system is set up for electronic funds transfer (EFT), select whether the payment will be made via check or EFT. This field appears only if the Electronic Banking module is installed, and the menu is available only if the payable Type is Invoice.
For Benefit Of If the payment is being made on behalf of a resident, type or select the code for the resident.
Hold Payment Select the hold payment status for this invoice:
|
|
If you select a status that holds payment, you will not be able to process a payment for this invoice until you change the Hold Payment status to one that allows payment.
|
Default Voyager uses the setting from the Vendor screen.
Consolidate Select whether to consolidate this payable with others for this vendor, or to process this payable with a separate check.
Memo from Inv Choose the source for text on check memos.
Entity Type or select a property code.
Amount Type the monetary amount for the line item.
Account Type or select the G/L expense account.
User-defined segments Complete the user-defined columns that follow the Account column in accordance with your organization's policies. For more information, see “G/L Segments” in the Voyager Core Setup Guide.
|
|
If you need more rows, click More Rows.
|
|
a
|
Property Type or select the codes for the properties or property lists.
|
|
Amount Type the total amount you want distributed.
Account If you want to use the same G/L account for each property, type or select the account number. If you want to use different G/L accounts, leave this field blank and type the account numbers in the Payable screen.
|
c
|
Click OK. Voyager adds a line to the spreadsheet for each property in the distribution. It splits the total amount evenly by the number of individually added properties or, for property lists, splits the total in accordance with the percentages set up in the Property List screen.
|
|
a
|
|
b
|
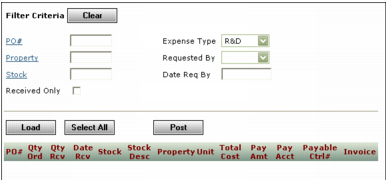
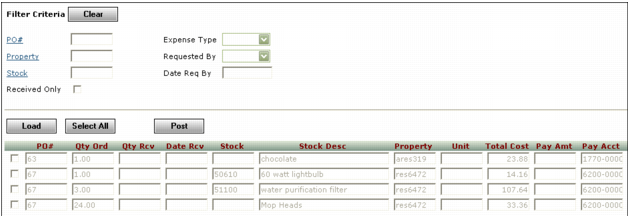
Complete the Filter Criteria section to locate the purchase orders you want. Leave all fields blank to access all unposted purchase order batches for the vendor specified in the Payee field in the Payable screen.
|
|
c
|
Click Load. Voyager displays available lines from unposted purchase order batches that meet the filter criteria.
|
|
d
|
Select the check box to the left of the PO# field for each line you want to add to the payable.
|
|
e
|
Click Post. Voyager adds the selected lines to the payable spreadsheet. For each added item, the PO# column at the right end of the spreadsheet displays a link to the purchase order.
|
|
a
|

|
b
|
When you are through viewing the screen, click Close. (If you are ready to save the payable, you can click Save.)
|
|
11
|
Complete the fields in the bottom section of the Payable screen.
|
Cash Acct Type or select a G/L cash account or leave this field blank to use the default cash account.
AP Acct Type or select a G/L accounts payable account, or leave this field blank to use the default accounts payable account.
|
12
|
If you are creating a payable to record a check processed manually, complete the Manual Check Info section.
|
Check Date Type the check date (mm/dd//yy).
Check Period Type the month the processed check affects the G/L (mm/yy).
Check # Type the check number.
|
13
|
Click Save.
|
Repeat this process for each payable in the batch. Voyager presents a new Payable screen until the total amount of the payables entered matches or exceeds the total declared, or the number of payables entered matches the items declared. Then the Batch Payable screen appears. This screen displays the total amount and number of items declared and entered.