|
3
|
From the side menu, select Receivables > Create Summary Batch or Payments > Create Summary Batch. The Summary Batch Receipt filter appears.
|
|
4
|
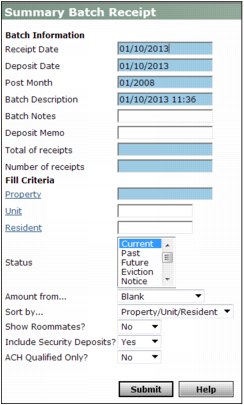
Under Batch Information, provide information that applies to the batch:
|
Receipt Date Accept the system date default or type the date you want to record the receipts in this batch (mm/dd/yy).
Deposit Date Accept the system date default or type the date the receipts were deposited (mm/dd/yy).
Post Month Accept the current operating month default or type the month you want the receipts in the batch to affect the G/L (mm/yy).
Batch Description Accept the system date and time default description or type a description for your batch.
Batch Notes Type notes about the batch. These notes disappear once you post the batch.
Deposit Memo Type information regarding the receipt deposit.
Total of receipts Enter the total monetary amount for receipts in the batch.
Number of receipts Type the number of receipts in the batch.
|
5
|
Under Fill Criteria, provide information that applies to all or most individual receipts in the batch (you can override this information in the Receipt Batch screen):
|
Property Type or select a property code.
Unit Type or select a unit code.
Resident Type or select a resident code.
Status Select the appropriate resident or tenant status.
Amount from Select the source of the amount to automatically complete the Amount Paid field:
Monthly Rent The Amount Paid field in each receipt defaults to the amount from the Rent field on the Resident or Lease screen.
Unpaid Charges The Amount Paid field in each receipt defaults to the total amount of unpaid charges for that resident or tenant.
Blank The Amount Paid field in each receipt defaults to zero.
Sort by Select the order you want to display your receipts.
Property/Unit/Resident Displays the receipts on the screen first by property code, then unit code, then resident or lease code.
Resident Code Displays receipts by the resident or lease code.
Resident Name Displays receipts by the last name of the resident or tenant.
Include Security Deposits Select Yes if your batch includes security deposits; select Only if it includes only security deposits; select No to omit receipts for security deposits.
ACH Qualified Only Select Yes to create a batch that includes only EFT qualified residents or tenants; select No if EFT qualification is not important.
|
|
The term ACH (Automated Clearing House) is sometimes used interchangeably with EFT (Electronic Funds Transfer) in Voyager. For more information about using EFT, see the Voyager Electronic Banking User's Guide.
|
|
6
|
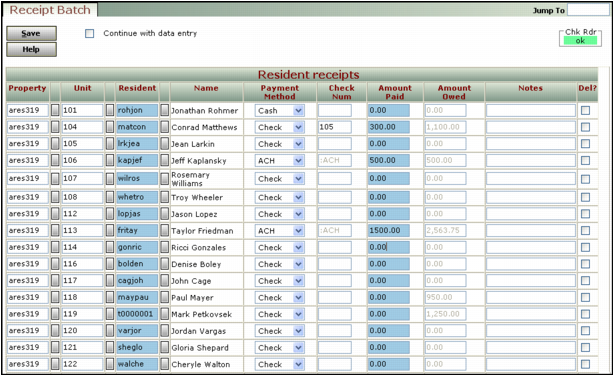
The Resident receipts section contains one receipt line for each resident or tenant (and each roommate, if that options was selected). If you chose to include deposits, the Security deposit receipts section appears and includes one row for each resident or tenant. Double click the code in the Resident column to display the associated resident or lease record.
|
7
|
Click the Continue with data entry check box if you do not want to exit the Receipt Batch screen after clicking Save. Voyager automatically clears the check box each time you click Save.
|
|
8
|
Under the Resident and Security Deposits receipts sections, complete the following fields for each resident for whom you are recording a payment:
|
Payment Method Select a payment method from the list:
|
n
|
Select ACH if the payment was made through ACH. If you select ACH, the Check Num field changes to :ACH.
|
|
|
The term ACH (Automated Clearing House) is sometimes used interchangeably with EFT (Electronic Funds Transfer) in Voyager. For more information about using EFT, see the Voyager Electronic Banking User's Guide.
|
|
n
|
Select Check if the payment was made with a check. If you select Check, type the check number in the Check Num field.
|
|
n
|
Select Cash if this payment was made in cash.
|
Check Num Type the check number if the resident paid with a check.
Amount Paid Accept the amount paid default as defined in the Amount from field on the filter, or type a new amount.
Notes Type notes for the receipt.
|
9
|
In the Non-Resident receipts section, complete the following fields for each non-occupant receipt you want to add to the batch:
|
Property Type or select a property.
Name Type the name of the non-occupant payer.
Cash Equiv Select this check box if the payment was in cash.
Check Num Type the check number if the payment was by check.
Notes Type notes for the receipt.
Amount Type the total amount of the payment.
Charge Type Type or select the charge code for the payment.
|
10
|
When you have entered the last receipt, be sure Continue with data entry is not selected and then click Save.
|
Voyager saves the receipt batch, exits the Receipt Batch screen, assigns a batch number to your new batch, and displays the Summary Batch Receipt screen.
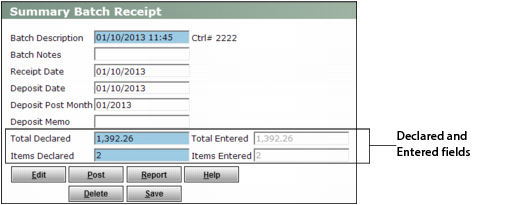
The Declared and Entered fields must match before you can proceed. If they do not, you can modify the amounts in the Declared fields or click the Edit button to return to the Receipt Batch screen and make changes there.
|
11
|
|
12
|
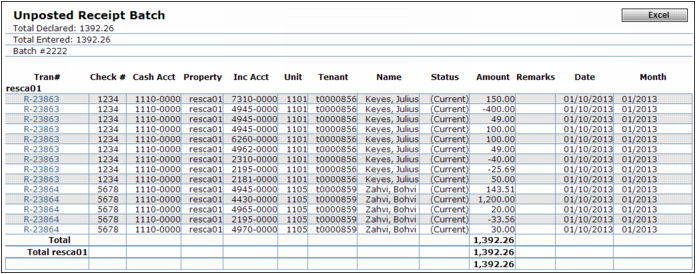
To print the report, right-click the report screen and select Print from the shortcut menu.
|
|
14
|
|
15
|
When asked to confirm that you want to post, click OK. Voyager posts the batch and displays confirmation.
|