|
1
|
|
|
If you are using Voyager Construction and Job Costing, select G/L (JC) > Recurring JE > Add Recurring JE. The Construction and Job Costing Recurring Journal Entry screen includes additional columns, which are described in this procedure with the designation “Construction only.”
|
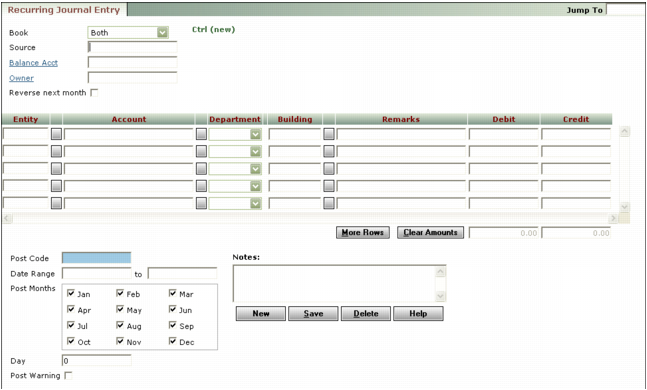
Book Select the accounting basis for this recurring journal entry. If you select Both, Voyager keeps cash and accrual records for the journal entry.
Source Type the source of the journal entry. Voyager includes the source on the Journal Entry Register report. You can use the source as selection criteria.
Balance Acct Select the account to use for balancing a property's books if the journal entry is not balanced for each included property. This field appears only if Multiple Properties on JE is selected in the Accounts & Options screen.
Reverse next month Select this check box if you want Voyager to automatically create a second journal entry reversing the recurring journal entry transaction the following month. If this check box is selected, Voyager creates the journal entry and the reversing journal entry simultaneously.
Contract (Construction only) Type or select the contract code associated with the recurring journal entry.
Job (Construction only) Type or select the job code associated with the recurring journal entry.
Entity If your database is set up to include multiple properties on journal entries, this column appears in the spreadsheet. Type or select a property code.
Categ (Construction only) Select the job category code.
Account Type or select a G/L account.
Remarks Type remarks for this line item.
Debit If this line item is a debit, type the monetary amount you want to debit. An amount in the Debit column increases the balance in an account with a normal balance of debit, and decreases the balance in an account with a normal balance of credit. Total debits must equal total credits.
Credit If this line item is a credit, type the monetary amount you want to credit. An amount in the Credit column decreases the balance in an account with a normal balance of debit, and increases the balance in an account with a normal balance of credit. Total debits must equal total credits.
Quan (Construction only) If you are using unit-based accounting, type the quantity of the item for which you are making this journal entry. See “Unit-Based Expense Tracking” in the Construction Management User's Guide.
Draw Date (Construction only) If necessary, override the automatically entered draw date.
|
4
|
Type remarks for the entire journal entry in the Notes field. Text from this field is searchable.
|
Post Code Type a posting code. When you post recurring journal entries, you can use this code to select which recurring journal entries to post. You can use the same code for multiple recurring journal entries and post them in one operation.
Date Range Type the date range for posting the recurring journal entry (mm/dd/yy). Leave the second field blank if you want to continue posting the recurring journal entry indefinitely.
Post Months Select the check box for each month you want to post the recurring journal entry. Voyager posts the recurring journal entry only for the months you have checked.
Day Type the day (between 1 and 28) of the month you want Voyager to use when you post the recurring journal entry. If you leave the field blank, Voyager uses the Post Date from the Post Recurring Journal Entry screen.
Post Warning Select this check box if you want Voyager to warn you if you attempt to post a recurring journal entry in a month for which it has already been posted. You can ignore the warning.
Notes Type remarks you want included in the Notes field of each generated journal entry.
|
6
|
Click Save.
|